The Must-Have Add-Ons to Make the Most Out of Anki

Anki is a powerful piece of software that allows you to put control of your memory into your own hands.
And with add-ons, you can make Anki even more powerful.
Now, Anki is plenty powerful on its own, and you don’t need add-ons to use it to become the master of your memory. But even though Anki is powerful, there are things that it is missing. For example, Anki offers no easy way to create cloze cards out of images, only text. Thankfully, there’s an add-on for that, created by the Anki community.
The community surrounding Anki is one of the best things about Anki. It truly is one of the main reasons why Anki is such a great piece of software.
There are close to a thousand add-ons listed on Anki’s official page by my count. That’s a thousand add-ons that someone decided to spend the time to create and then share with others, for free. How amazing is that?
But with a thousand add-ons to choose from, it can be daunting to know which ones are useful and which ones you can choose to ignore, which is why I created this list.
Now a word of warning: If you are new to Anki and have never used it, the remainder of this article will sound like gibberish to you. Before you jump straight into exploring the many add-ons Anki has to offer, I recommend you start out by reading my gentle introduction on how and why you should use Anki. Afterward, all of this will make sense.
So, without further ado, let’s start from the beginning, and that means learning how to install add-ons.
How to Install Add-ons in Anki
To install an add-on in Anki, you need to first find the page for the add-on you want to install (here are all the add-ons that are listed on Anki’s official page), find the code for the add-on, and add it to Anki.
Here is how you do that.
First, look for a code like this:

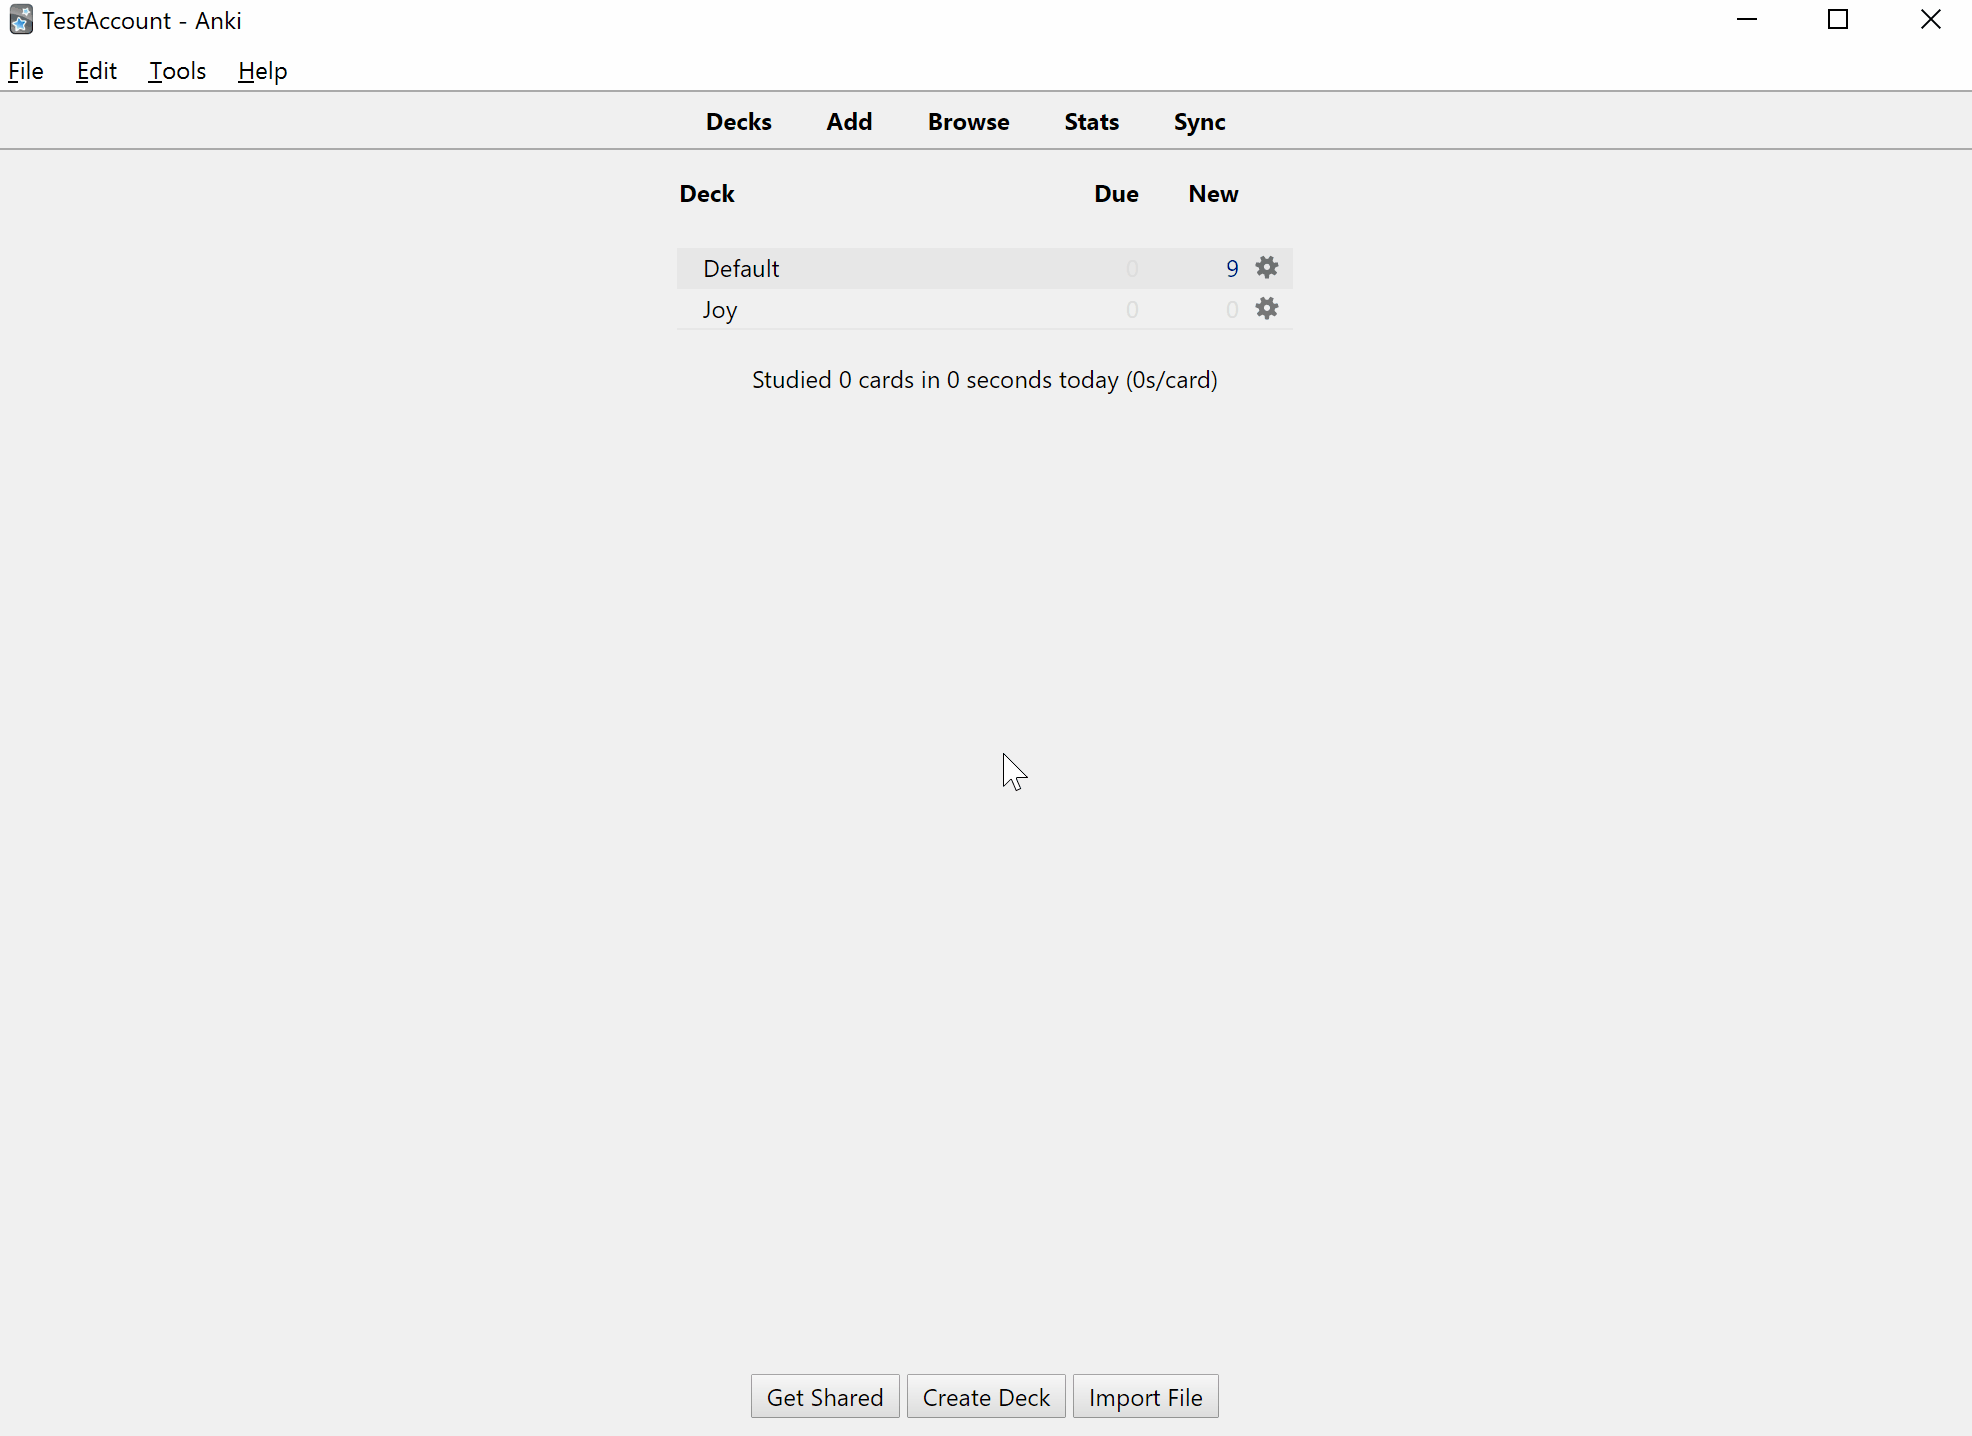
Once you have your code, open Anki. On the options bar, you will find the Tools menu. Open it and click on Add-ons.
This will open a window with a list of all the add-ons you have installed, meaning if you’re new to Anki it will be empty, and to the right, you will find the Get Add-ons button. Click on the button and add the code. This will make Anki download and install the add-on from the code.
Once that’s done, restart Anki. You have now installed your first Anki add-on.
Now that you know how to install add-ons, here are some add-ons I think you absolutely must have to make the most out of Anki.
Image Occlusion Enhanced
By default, Anki allows us to create cloze deletions of text, where you […] parts of the question and then try to guess them. What the Image Occlusion Enhanced add-on does is extend that concept to images.
Creating image cloze deletions is a fast way to create new cards. It is a good bet that what you’re learning includes some helpful diagrams or illustrations, and you can use this add-on to hide parts of them for you to fill in your reviews.
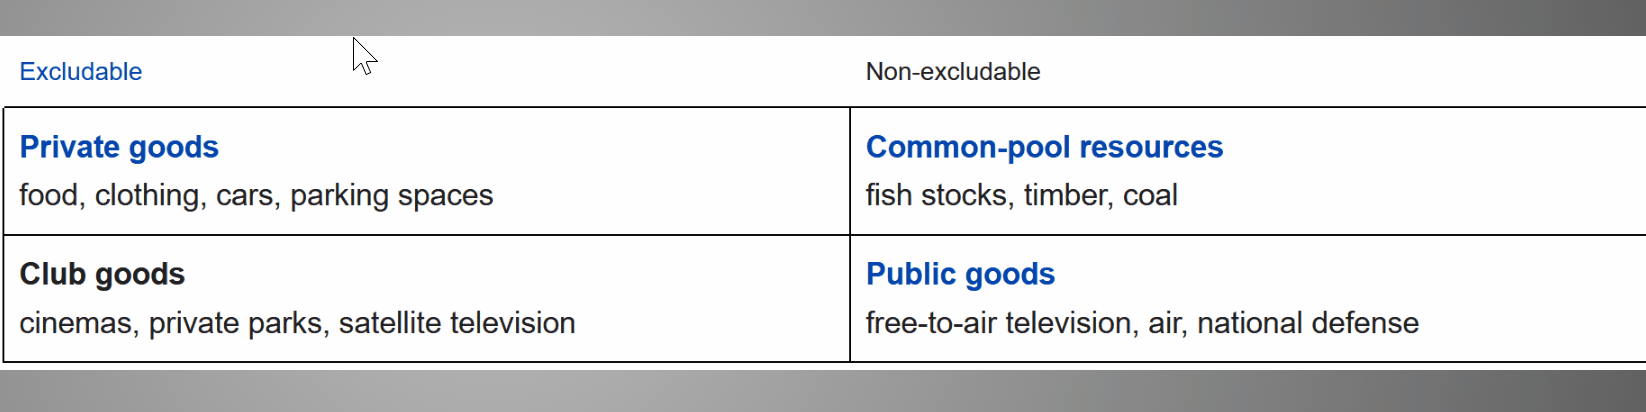
For example, when I was reading up on the different types of economic goods there, I found this table from Wikipedia:

I noticed straight away that I could use this table and create multiple cards with this add-on.
I am going to walk through the process I followed and show you step-by-step how you can use this add-to create cards:
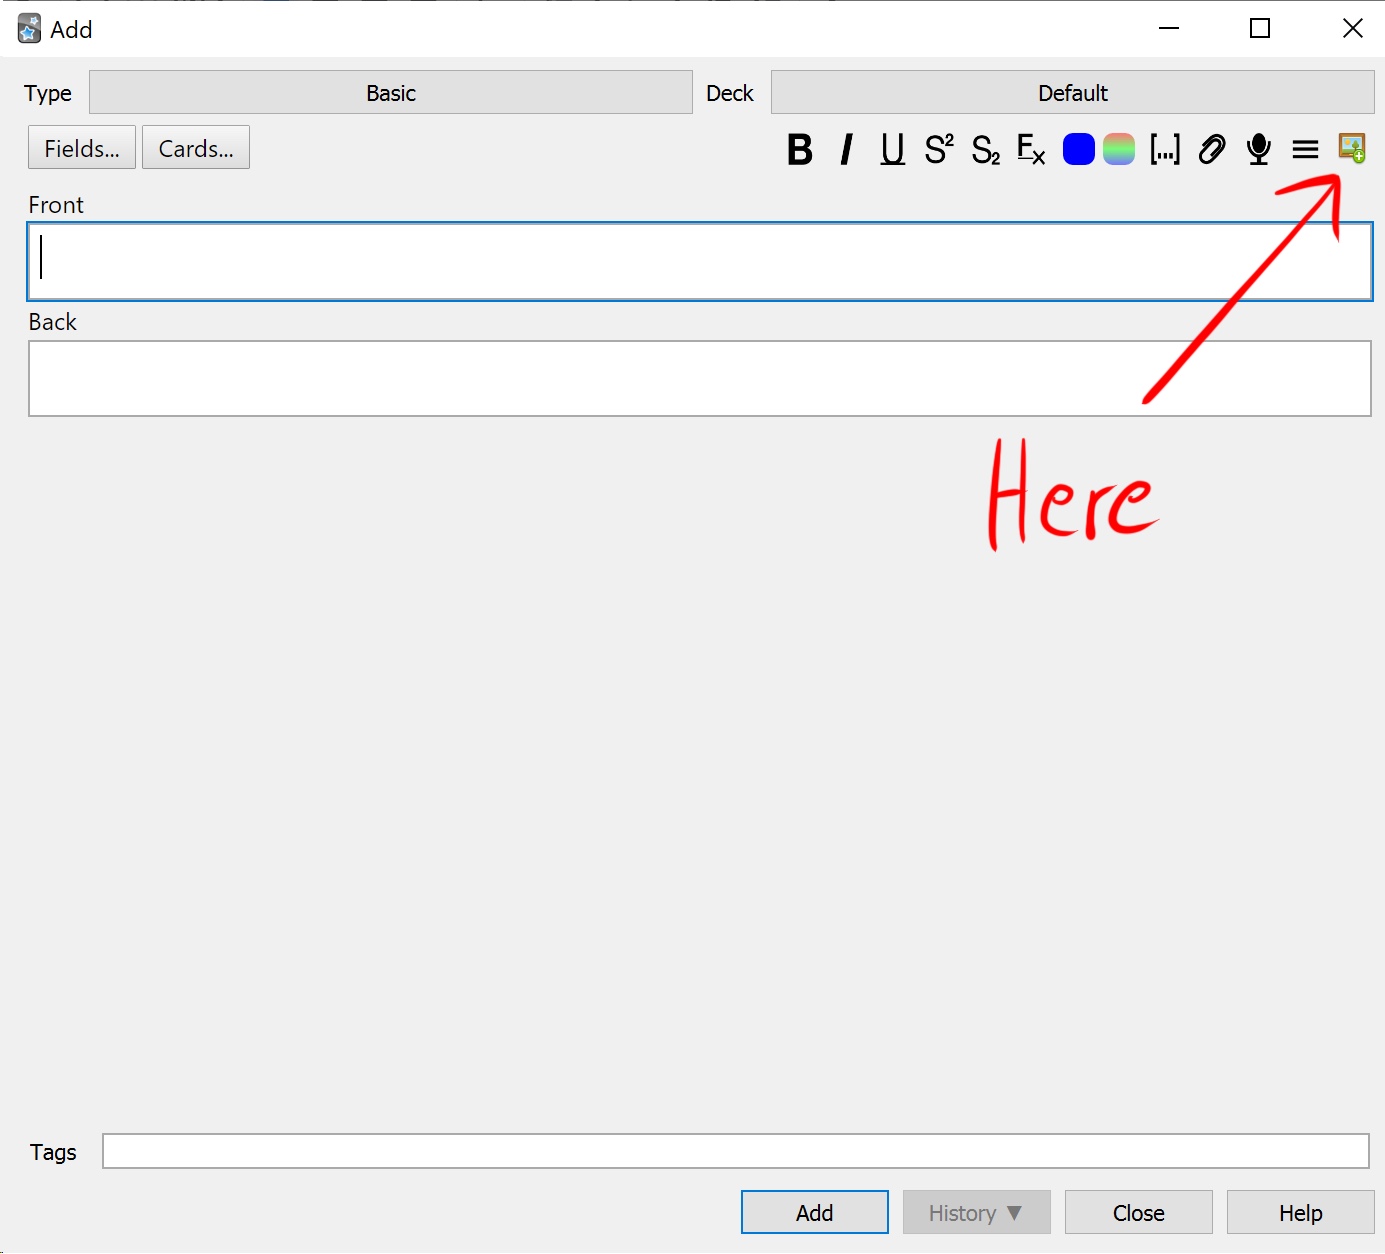
I first take a screenshot of the table and save it on my Desktop (you can save it wherever you like; I just used the Desktop because I know I will be deleting it shortly after). Then I create a new card and click on the Image Occlusion Enhanced Icon that is on the icon bar:
I choose the image I’d previously saved, and that’s when this monstrosity greets me:
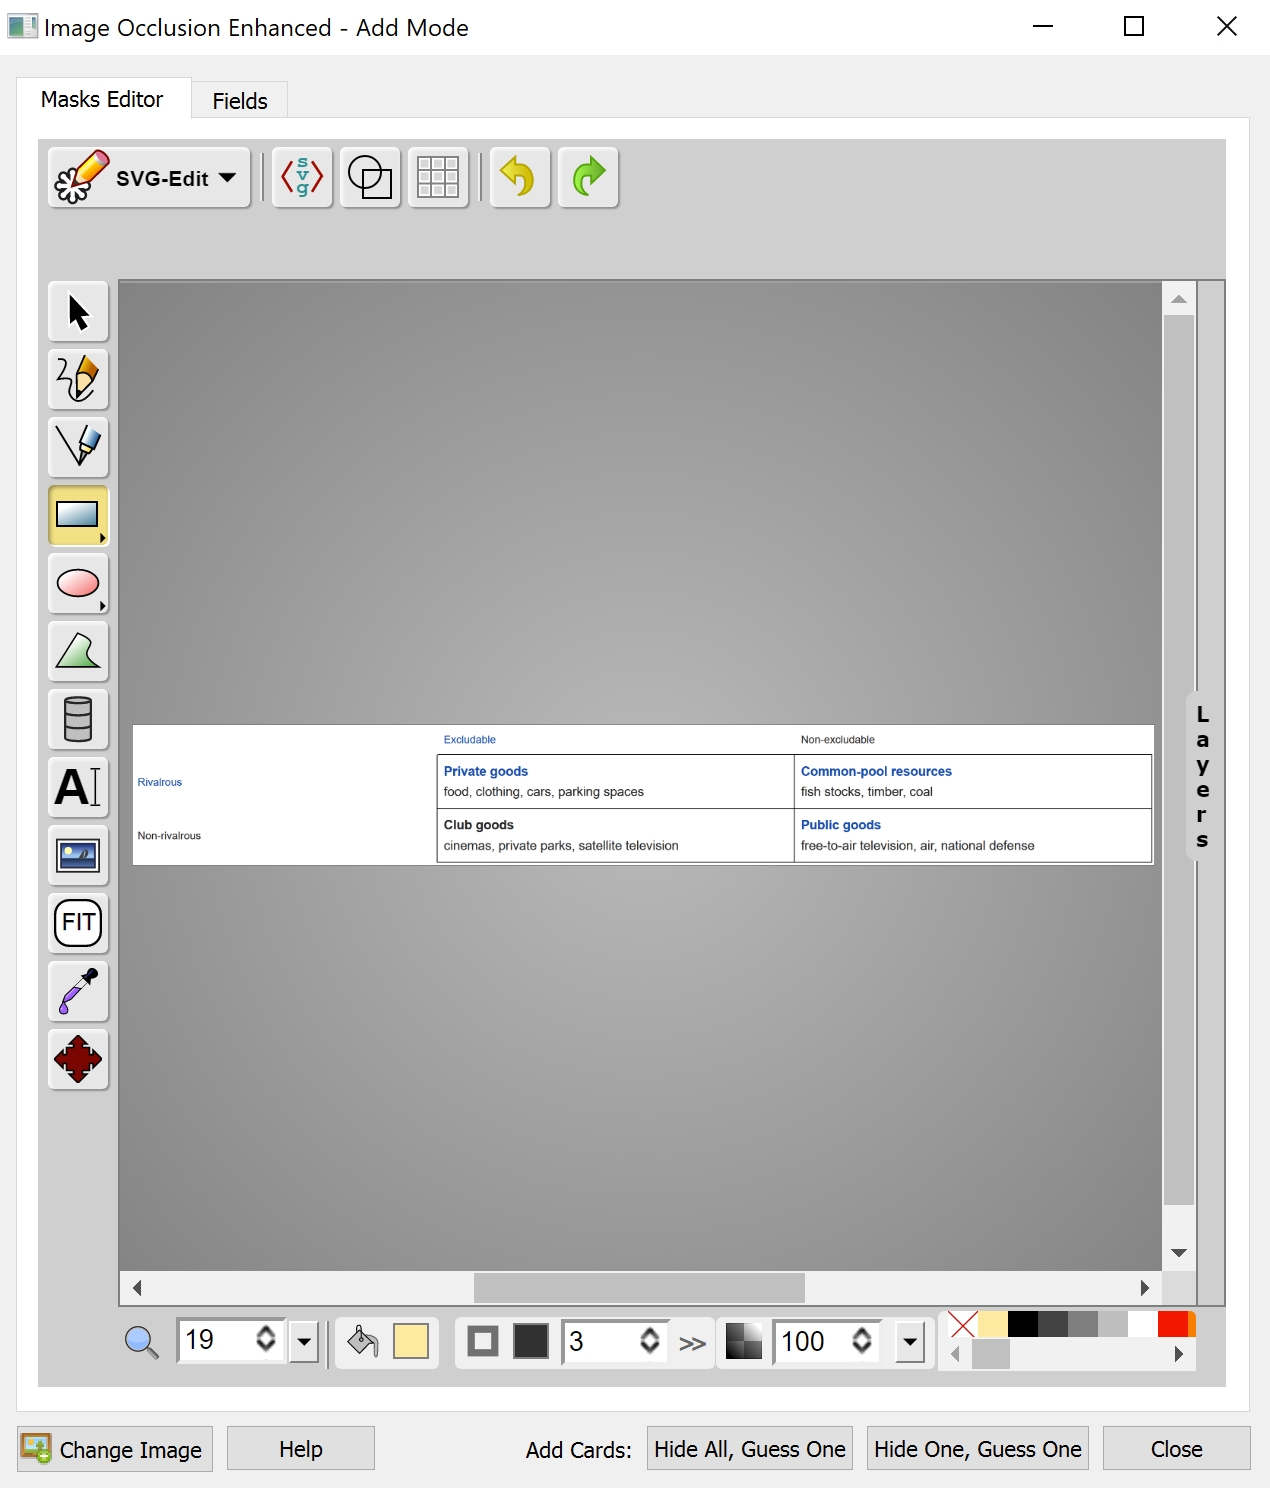
I know. It’s a lot. I don’t know what most of it does, to be honest, but it doesn’t matter. What I do understand - which is simple, and I will show you how to use - already makes this one of the most useful add-ons in Anki.
Now I must choose which parts image I want to hide and create an image-based cloze deletion out of it. Given the image I am working with, and what I want to retain from it, I think choosing the different types of goods is the best bet.
To create the cards, I use my mouse and select the area I want to hide, like this:
With that done, now I must select how I want my cards to be created. The add-on gives me two options: I can either create cards where all parts of the image I selected are hidden and I have to guess one, or, instead of hiding all parts, it hides only the one I must guess.
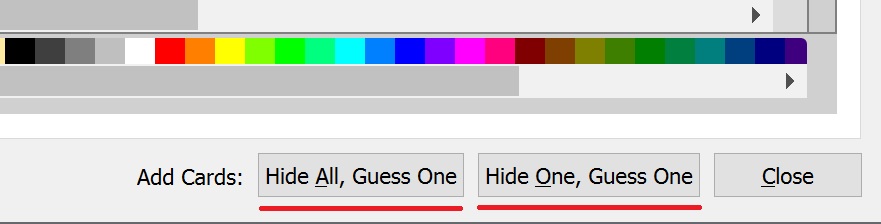
I tend to pick the latter option because cards come away cleaner that way, but that is a personal preference. Because I selected four different parts of the image to be hidden away from me, this will create four different cards, one for each hidden section.
I am now ready to do my daily reviews. Here is what Anki shows me:

Hmm, what is the name of a good that is both rivalrous, meaning that I if I use it then no one else can use it as well, like eating a sandwich, and excludable, where it’s possible to forbid people who haven’t paid for it to enjoy it? Oh, I know, that’s a private good!
Now that I know the answer - and even if I didn’t – it’s time for Anki to show me the part that’s hidden from me:
See, it is a private good. I knew it.
That’s the gist of how to use the Image Occlusion Enhanced addon. It’s pretty powerful, and useful, as you can see. It has a lot more functionality; You can, for instance, group different parts so that instead of creating, say, three cards because you hid away three different sections, it creates instead a single card, but knowing the basics already makes this add-on one of the most powerful you can use to make the most out of Anki and you can always dig deeper into this add-on later if you want to.
Review Heatmap
Doing your daily reviews, well, daily, is the most important thing when using Anki and spaced repetition software in general. As I noted in the gentle introduction to Anki, your number-one priority is to keep doing your daily reviews, and in this article where I laid out five of the strategies that have helped me do my reviews consistently, I noted that tracking when you do and do not do them can help.
That’s where Review Heatmap comes in.
Review Heatmap adds a heatmap to your Anki main page where you can easily visualize your daily review streaks by filling each square with a color if you did your review or leaving it blank if you did not.
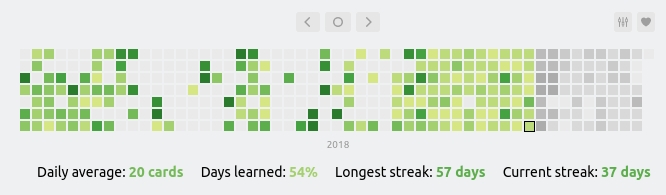
That way, each time you open Anki you will see straight away how you’ve been doing lately, whether you’ve been going through your daily reviews or not. What ends up happening is that after a few days of doing your daily reviews and getting a nice streak going, you will not want to break it. It will be 1 AM, you’re about to go to sleep, your eyelids are already heavy, when it suddenly hits you that, crap, you didn’t do your daily review! So you pick up your phone (using the mobile app to do your daily reviews is one of the things I recommend doing in this article) and do it because not doing so would mean having a blank square on your heatmap and breaking the streak, and you absolutely cannot have that.
It’s admittedly a simple add-on. It doesn’t make Anki do anything it didn’t do before, like the other add-ons in this list do, but it is a very effective way to motivate you to not miss doing your reviews, and for that, it has to be one of the most valuable ones for you to use.
To install the Review Heatmap add-on you will have to do things a little differently.
- Open this link (it will download the latest version of the add-on from its official page)
- Go to the folder where you downloaded the file and double-click it. This will open a prompt from Anki asking if you are sure you want to install an external add-on. Choose Yes, and it will be installed (Review Heatmap is developed by Glutaminate, a trusted and well-known member of the community, so you can trust it).
- If the step above did not work for whatever reason, you can open the Addon page as you did for the other add-ons, and instead of clicking on Get Addons select the Install from file button. Choose the file you download, and you should be good to go.
Godmode
If you’ve ever used Anki, then you know in your bones how fatiguing it is to switch between Note types whenever you want to create Cloze notes and then have to switch back when you want to create regular ones.
Worse, sometimes you forget to switch note type and the last twenty cards you’ve added are all wrong and you have to redo them.
That’s where Godmode comes in.
What if whenever you add new cards Anki is smart enough to figure out their correct note type? After all, if you’re adding cards {{c1:: with clozes in them}}, it follows they should be of the Cloze type.
Godmode makes Anki smart enough to do that, automatically switching to Cloze and back based on the content of each note. It also introduces easier keyboard shortcuts to create clozes, but you easily configure them to go back to the Anki default ones or to make them fit your own needs.
Resize images in editor.
This one also gets rid of a lot of headaches. Honestly, I don’t get why it doesn’t come with Anki in the first place.
It does exactly what it says it does. It allows you to resize images in the editor instead of having to resize them beforehand. You add the image to Anki, see that it’s too big, and instead of having to exasperatingly resize it with another program, you do it all within Anki.
That’s it. That’s all it does. But believe me, it makes everything related to dealing with images in Anki much less painful.
Frozen Fields
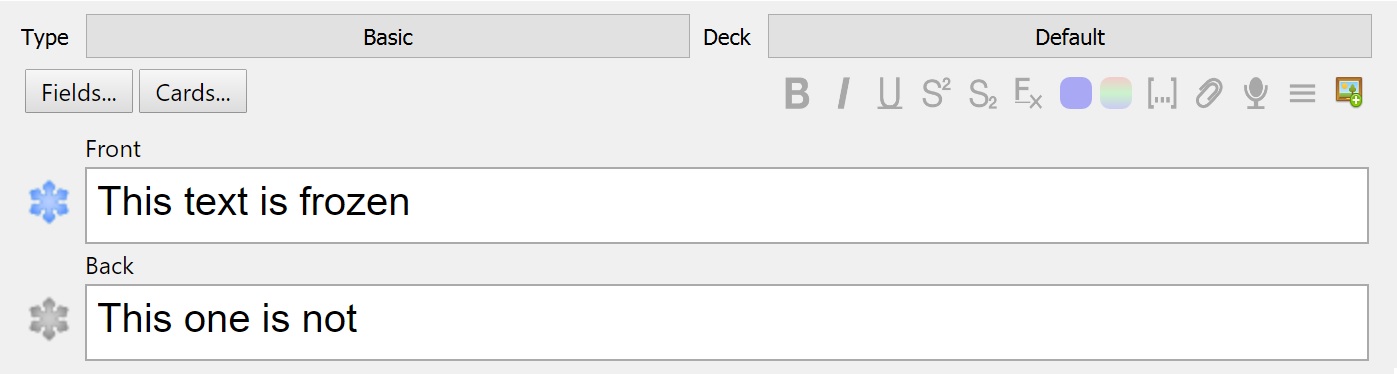
What the Frozen Fields does is, well, it freezes fields.
Suppose you want to add five cards that differ from each other by only a few words. It would be tedious to write everything each time you added a card. Just as an example, let’s say for whatever reason you want to memorize the periodic table of elements (please don’t). You add the following card:
Question: In the periodic table, what is the symbol for beryllium?
Answer: Be
One down, many more to go. Let’s go down the alkaline metals column and add magnesium next:
Question: In the periodic table, what is the symbol for magnesium?
Answer: Mg
Two down, how many more to go? A lot. 116 to be precise, and if you were really to go through with this (seriously, don’t), having to write it all up for each element when you only need to change two words would make what is already dull even duller.
Of course, you could always copy and paste it for each card and then change the two words you need, but that’s still a couple of keystrokes you have to make when you’d rather Anki take care of it all.
Frozen Fields takes care of that by adding a little snowflake icon next to the Front and Back fields where you can tell Anki to not erase the text in those fields when you add a card.
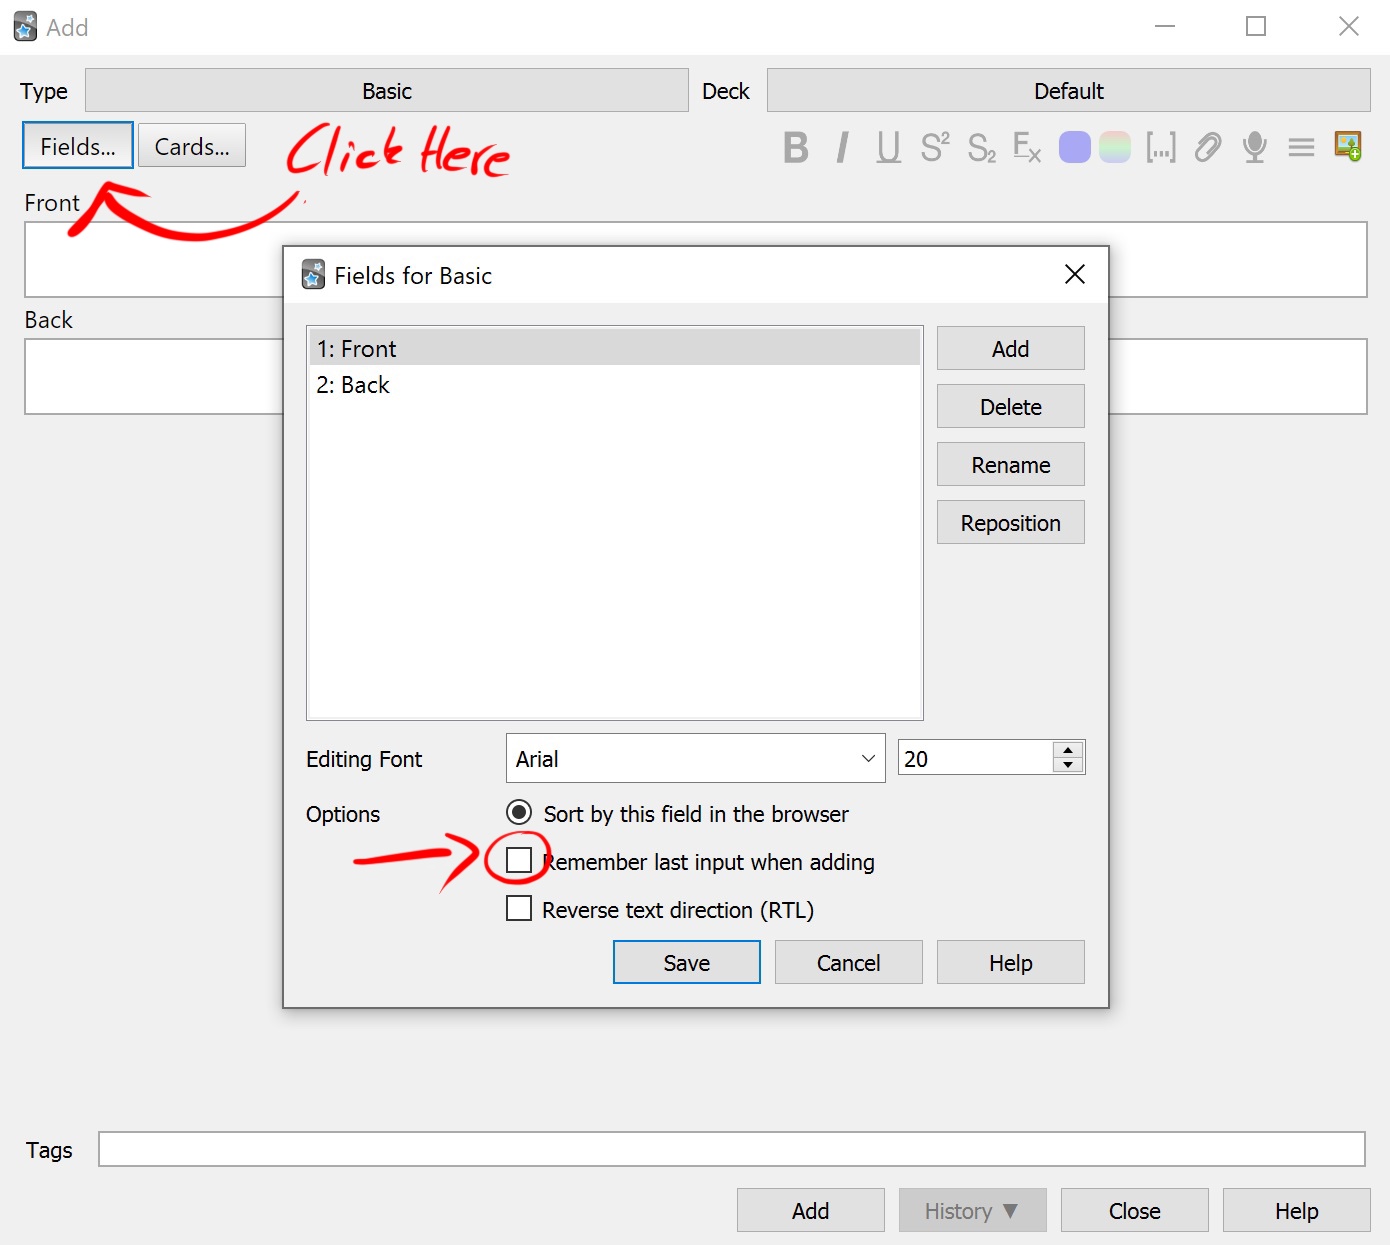
Anki also offers a way to get this same feature, although it won’t be able to switch it on and off so easily as with the add-on. To do so, click on the Fields button as shown in the image below and turn on the “Remember last input when adding” setting.
Mini Format Pack
This add-on is another that goes for the “should be included in Anki by default” list for being immensely useful and getting rid of a lot of headaches.
It allows you to:
- Easily align your text - useful when you want to center text
- Create ordered and unordered lists
- Highlight or strikethrough text
And some other features, like easily indent text or add a code block.
It might not seem like much. After all, don’t all text editors have these features? Not Anki, which is why this is one you should add to your add-on collection. Apparently, in the past, there was a much more robust version of this add-on that also included Markdown support alongside some other goodies, but as far as I can tell no one has ever ported all its functionality to be compatible with Anki’s latest version, but at least the Mini Format Pack add-on already provides a lot of its nicer features (an easy way to center text, praise the gods!).
How to find more add-ons (and some pitfalls to avoid)
These are but six of the almost thousand Anki add-ons the Anki community has to offer, and I am sure there are many others that could be useful to you and your particular needs but which I haven’t touched upon. You should absolutely look at the remaining ones to see what they have to offer you.
There are, however, some risks with using random add-ons from the Internet. Some might not work at all; others might be malicious and try to infect your computer or irretrievably delete your entire collection of flashcards.
Let me then offer a parting gift of advice on how you can weed out good Anki add-ons from bad ones:
- What does the community say about them? Search for the add-on online. See what people on the r/Anki subreddit say about it. Chances are, if it’s a good add-on, someone else will have talked about it before.
- Read the reviews on the add-on page. There’s a reason they’re there. If there are no reviews, and it doesn’t seem like many people are using it, then I recommend you play it safe and stay away from it.
- Search for add-ons with high ratings. The official page for Anki add-ons allows users to positively or negatively rate add-ons. That should give you a good idea of whether the add-on is good or not.

Get more content like this!
Increase your cognitive fitness with the best strategies and advice to help you make the most of your mind.
I hate spam as much as you. Superpowered Self will only send you quality content.